
General Printer Error Code Reference
A cross-brand decoder for printer error codes — how panels, message strings, LED patterns and companion apps signal faults, the universal code families every manufacturer shares, and a calm, repeatable workflow for turning a code on your screen into the right next step or the confidence to stop and call service.

Every printer error code is a message written in a compressed shorthand. When a machine cannot complete a job — a sheet stalls in the paper path, a fuser fails to reach temperature, a printhead reports a fault, a cartridge runs dry, or the network connection drops — it needs to tell you what went wrong without a keyboard or a screen full of prose. Different manufacturers solve that problem in different ways, but the underlying grammar is remarkably consistent, and once you understand how the signalling works, an unfamiliar code stops being intimidating and becomes something you can read.
Broadly, printers signal errors in four ways, and most models use more than one at once. A numeric or alphanumeric panel code (such as HP’s 49.XX.YY, Canon’s support codes, Epson’s two-part codes or Ricoh’s SC codes) is the most precise signal, because it usually maps to a documented family. A plain-language message string (“Replace toner”, “Paper jam in rear”, “Filter clean required”) tells you the same thing in words and is common on multifunction panels. LED grammar — the pattern of which lights are lit, blinking or a particular colour — carries the message on entry-level printers with no display, and the exact pattern varies by model, so it must always be confirmed against your model’s guide. Finally, the manufacturer’s companion app or embedded web server (HP Smart, Canon IJ Printer Assistant Tool, Epson Status Monitor, Brother iPrint&Scan, Ricoh Web Image Monitor and their equivalents) often shows a fuller description than the panel can.
Beneath those four channels, the same fault families recur across every brand: paper-path and jam codes, heat and fuser families on laser machines, printhead and ink-system families on inkjets, consumable lifecycle messages, network and communication families, and firmware or controller families. A jam is a jam whether it shows as a number, a message or a blinking light; the causes and the safe response are the same. This reference is organised around those shared families so that, wherever your printer sits, you can recognise the shape of the problem before you look up the exact code.
Use this page as the front door, not the final answer. The single most important caveat with printer error codes is that they vary by model, generation and firmware: the same number can mean slightly different things on two machines from the same manufacturer, and light patterns differ across a single product line. So read your code exactly, understand which family it belongs to here, follow the universal decode workflow, and then open the matching brand library — HP, Canon, Epson, Brother, Lexmark, Ricoh, Xerox, Kyocera, Samsung, Pantum or Zebra — to confirm the precise meaning for your model before you act on anything irreversible.
Quick Symptom Lookup
Not sure where to start? Find your symptom below to identify the error family and your first action.
| Symptom | Likely Error Family | First Action | Related Guide |
|---|---|---|---|
| Printer stops mid-print, display says "Paper Jam" | Paper-path & jam | Open covers named on display, remove paper gently in travel direction | Paper Jam Guide |
| Tray is full but printer says "Load paper" | Paper-path & jam | Fan the stack, reseat squarely against guides, push tray fully home | Paper Feed Guide |
| Laser printer shows code starting with 50 or "Fuser Error" | Heat & fuser | Power off completely, wait 30 min to cool, power on once — if it returns, arrange service | Error Codes Guide |
| Inkjet shows "B200" or "Printhead Error" | Printhead & ink-system | Power cycle once; re-seat printhead if removable; clean contacts gently | Error Codes Guide |
| Cartridge just installed but printer says "Not Recognised" | Printhead & ink-system | Remove cartridge, confirm all tape is off, wipe contacts, reinstall | Low Ink Guide |
| "Ink absorber full" or "Maintenance box full" | Printhead & ink-system | Replace maintenance box if your model uses one; otherwise check brand library for service reset | Error Codes Guide |
| Toner warning light on laser printer | Consumable lifecycle | "Low" — keep printing with replacement ready; "Replace" — install fresh cartridge | Error Codes Guide |
| Printer shows "Offline" or "Not Connected" | Network & communication | Print a network config page, restart router and printer, confirm IP address | Printer Offline Guide |
| Panel shows "49.XX.YY" or "Service Code" | Firmware & controller | Cancel stuck jobs, power cycle once; if it returns, arrange service | Error Codes Guide |
| All lights blinking but no display | LED pattern — varies by model | Photograph the lights, then look up that exact pattern in your model's manual | Error Codes Guide |
| "Service Required" with no further description | General service | Check companion app for fuller description; power cycle once; consult brand library | Error Codes Guide |
How to use this reference
This is a cross-brand reference, so nothing here is a substitute for your model’s own documentation — it is the layer above it. The families and worked examples below are drawn from the eleven brand libraries on this site, and every meaning is written as a family, not an absolute. Treat a code you see on your panel as a starting point: identify the family it belongs to here, read the general guidance, then follow the link to the brand library for the exact wording, sub-codes and reset steps that apply to your specific machine.
Codes are not standardised across manufacturers. There is no shared registry, so a “50” on one brand and a “50” on another are unrelated; each maker designs its own scheme. That is why the honest workflow is always “recognise the family, then look up the brand”. Where a brand uses light grammar rather than numbers — common on entry-level HP, Canon, Brother, Samsung and Pantum models — the exact pattern varies by model, and the only reliable source is your model’s guide or embedded help. We present the grammar (which light, what colour, blinking versus solid) rather than promising one universal pattern.
Some codes are routine and some are a request for service, and telling them apart is the skill worth learning. Consumable and paper-path codes are almost always yours to clear. Heat, fuser, laser-unit, printhead-motor and controller-board codes that persist after a single power cycle are hardware territory, and repeatedly clearing or forcing past them can turn a repairable fault into a replacement. Every entry below carries a severity — low for routine and consumable, medium for “needs attention”, high for “this is service territory” — so you can calibrate how hard to push before you stop.
Finally, always note the context around a code: exactly what it says, character for character, and when it appears — at power-on, mid-job, only when printing a certain size, or only over the network. That context is often more diagnostic than the number itself, and it is the first thing a technician or the brand library will ask for. The universal decode workflow below builds that habit into five simple steps.
Severity levels used in this reference
How printer error signalling works
The four channels every brand uses to report a fault — panel codes, message strings, LED grammar and companion apps — and the universal workflow for turning any of them into the right next step.
How you'll usually notice this
- The printer stops and displays an alphanumeric code, a plain message, or a blinking light pattern
- Your computer shows a "printer error" notification or the companion app reports a status
- The printer beeps or the attention light turns on
- Print jobs queue up and nothing comes out
First things to check
- Read the code or message in full — write it down exactly, including any dots or letters
- Note when it appears: at power-on, mid-job, or only with certain paper sizes
- Power the printer fully off, wait 30 seconds, then power it on once
- If the code clears, send a simple test page to confirm
- If it returns, open the matching brand library before trying anything else
Error Entries
A short code shown on the control panel — for example HP’s 49.XX.YY, Canon’s support codes, Epson’s two-part codes or Ricoh’s SC codes. It is the most precise signal a printer gives, because it usually maps to a documented fault family; the exact meaning depends on the brand, model and firmware, so it must be confirmed in that brand’s library rather than guessed.
Common Causes
- A fault the printer can detect and classify, from a jam sensor to a firmware error
- A condition serious enough that a plain message would be ambiguous
- A model with a small display that shows codes rather than full sentences
What to do
- Read the full code exactly, including any dots, letters or trailing digits — the sub-code often changes the meaning.
- Note whether it appears at power-on, mid-job, or only for certain paper sizes or jobs.
- Power the printer off, wait about thirty seconds, and power it on once to clear transient faults.
- If the code returns, look it up in the matching brand library before acting on anything irreversible.
All brands that use coded panels — HP, Canon, Epson, Ricoh, Xerox, Kyocera and others; exact schemes differ by manufacturer.
Full guideA message in words rather than a number — “Replace toner”, “Paper jam in rear door”, “Load A4”, “Ink absorber nearly full”. Common on multifunction touchscreens, it is usually self-explanatory, though the recommended action still varies by model, and some messages (such as ink-absorber or maintenance-box warnings) hide a service consideration behind friendly wording.
Common Causes
- A consumable that is low, empty or reported as non-genuine
- A cover, tray or door left open or not fully closed
- A paper-size or media-type mismatch between the job and the tray
What to do
- Read the message in full and do exactly what it names first — close the stated door, load the stated size, replace the stated consumable.
- If it names a location, address that location rather than searching the whole machine.
- Power cycle once if the message persists after you have addressed what it describes.
- For maintenance-box, ink-absorber or “service required” wording, check the brand library before dismissing it.
Multifunction and display-equipped models across every brand; wording is manufacturer-specific.
On printers with no screen, the fault is signalled by which lights are lit, whether they are solid or blinking, and their colour — for example a red status light with a blinking toner light. This is a grammar, not a fixed code: the exact pattern varies by model, so it must always be confirmed against your specific model’s guide or quick-reference card.
Common Causes
- An entry-level printer with indicator LEDs instead of a display
- A consumable, cover or paper condition mapped to a light pattern
- A more serious fault shown as an “attention” or error light
What to do
- Note precisely which lights are on, which are blinking, and their colours — photograph the panel if it helps.
- Look up that exact pattern in your model’s manual or the brand’s LED reference; do not assume it matches another model.
- Try the obvious causes the pattern points to first — open covers, low paper, a consumable warning.
- Power cycle once; if the same pattern returns, treat it as a documented fault and check the brand library.
Entry-level models across HP, Canon, Brother, Samsung, Pantum and others; exact patterns vary by model — confirm in your model’s guide.
The manufacturer’s app or built-in web server frequently shows a fuller description than the panel can fit — the full text of a code, the affected consumable, or a suggested action. Tool names are brand-specific: HP Smart, Canon IJ Printer Assistant Tool, Epson Status Monitor, Brother iPrint&Scan and Ricoh Web Image Monitor are the common ones.
Common Causes
- A panel too small to display the complete message
- A fault more easily explained in software than on hardware
- A networked machine whose status you are checking from a computer
What to do
- Open the official app or the embedded web server for your brand and read the detailed status it shows.
- Cross-reference the full description it gives with the short code on the panel.
- Use only the manufacturer’s own software, named verbatim — avoid third-party “fixer” tools.
- Take the fuller description into the brand library for the precise family match.
Any brand with an official companion app or embedded web server; feature depth varies by model.
The five-step routine that works for any code on any brand: read the code exactly; note when it appears; power cycle once; look it up in the matching brand library; and know when a code means service, not DIY. It is deliberately conservative, because forcing past a genuine hardware fault is how a repairable machine becomes a replaced one.
Common Causes
- An unfamiliar code with no obvious cause
- A code that keeps returning after simple attempts
- Uncertainty over whether a fault is safe to clear yourself
What to do
- Read the code exactly — every character, including dots and letters — and write it down.
- Note exactly when it appears: at power-on, mid-job, on a certain size, or only over the network.
- Power the printer off, wait about thirty seconds, and power it on once — many transient codes clear here.
- Look the code up in the brand library that matches your printer and follow its model-specific guidance.
- If it is a heat, fuser, laser, motor or controller fault that persists, stop and arrange service rather than forcing past it.
Every brand and model — this is the safe default for any code.
Full guideRelated Guides
Paper-path & jam families
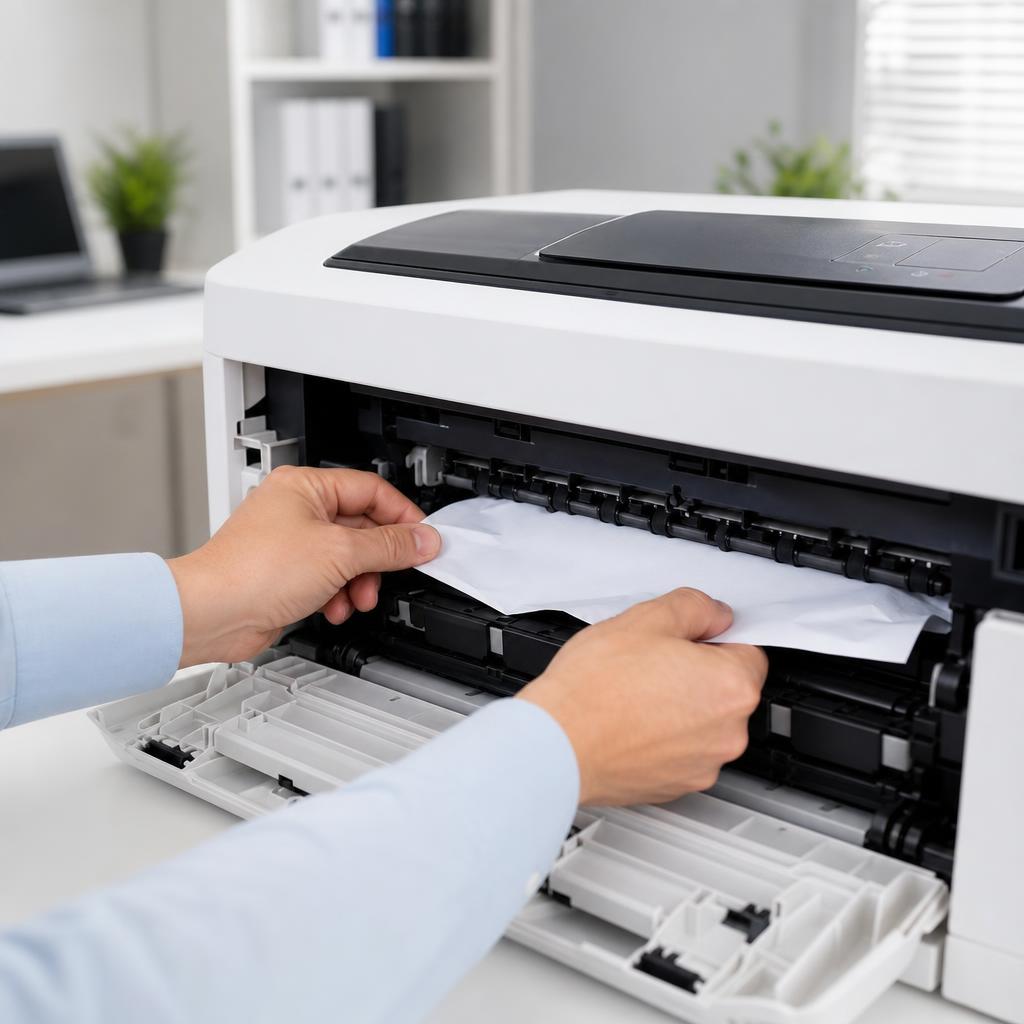
The most common and most DIY-friendly family. Whether shown as a number, a worded message or a blinking light, a jam or feed fault has the same causes and the same safe response across every brand.
How you'll usually notice this
- The printer stops mid-print and will not continue
- The display shows "Paper Jam", "Clear Jam" or a location like "Rear Door"
- A blinking attention light with the paper LED lit (on models without a display)
- The companion app shows a paper jam notification
- "Load paper" message even though the tray contains paper
First things to check
- Open every cover or door the display names — do not guess, let the message guide you
- Remove any jammed paper slowly and in the direction of travel — never pull backwards
- Check carefully for small torn fragments near rollers and inside the fuser area
- Reload a modest, flat stack of paper with guides set snugly (not tight)
- Close all covers fully and power cycle once if the jam message persists
- Confirm the paper size and weight matches what the tray is set to accept
Error Entries
A sheet has stopped where the printer expected it to move, or a sensor has been triggered along the path. The exact code, message or light pattern varies by brand and model — from Canon’s jam support codes to Ricoh’s jam-location messages — but the family behaviour is universal: the printer stops to protect itself and asks you to clear the path.
Common Causes
- Paper loaded above the guide line, curled, damp or of the wrong weight
- A torn fragment or foreign object left in the paper path
- Worn or dirty pickup and feed rollers
- Guides not set snugly against the stack
What to do
- Open the doors the panel or message names and remove paper slowly in the direction of travel.
- Look carefully for small torn fragments, especially near rollers and the fuser area.
- Reload a modest stack of fresh, flat paper with the guides set snugly but not tight.
- Close all covers fully and power cycle once if the jam message does not clear.
- If jams recur in the same place, inspect or service the rollers for that specific brand.
All brands; jam signalling ranges from numeric codes to worded location messages to LED patterns.
Full guideThe printer cannot pick media, either because the tray is empty or because it cannot sense the stack. On numeric brands this is often a dedicated code; on others it is a plain “Load paper” message or an attention light. It is almost always routine, though a persistent version can point to a feed sensor.
Common Causes
- An empty tray, or paper below the sensor’s minimum
- A tray not pushed fully home
- Paper loaded behind the guides so the pickup cannot reach it
- A dirty or failing paper-present sensor
What to do
- Add paper and confirm the stack sits below the maximum fill line.
- Push the tray fully closed until it seats.
- Fan the stack and align it squarely against the guides.
- If the message persists with paper loaded, power cycle once and check the brand library for a sensor fault.
All brands; shown as a code, a message or an attention light.
The tray settings and the print job disagree — for example a job set to A4 sent to a tray configured for Letter, or a plain-paper job to a photo-paper setting. The printer pauses rather than printing on the wrong stock. Wording and codes differ by brand, but resolving the mismatch is the same everywhere.
Common Causes
- Tray media settings not updated after changing paper
- A print job set to a size the tray does not hold
- A duplex or borderless job requiring a specific media type
- Mixed sizes in a single tray
What to do
- Confirm what is actually in the tray, then set the printer’s tray size and type to match.
- Check the print dialog on your computer is requesting the same size and type.
- Reprint after the settings agree, or press the panel option to continue on the loaded media if that is what you intended.
- For frequent mismatches, standardise on one size per tray.
All brands with configurable trays; codes and wording vary.
Stop troubleshooting if you notice
- You can hear grinding or cracking noises when trying to remove paper
- Paper is wrapped around the fuser or deeply embedded — do not force it
- The same location jams repeatedly after cleaning — the roller likely needs service
- There is a burning smell coming from inside the printer
Related Guides
Heat & fuser families (laser)
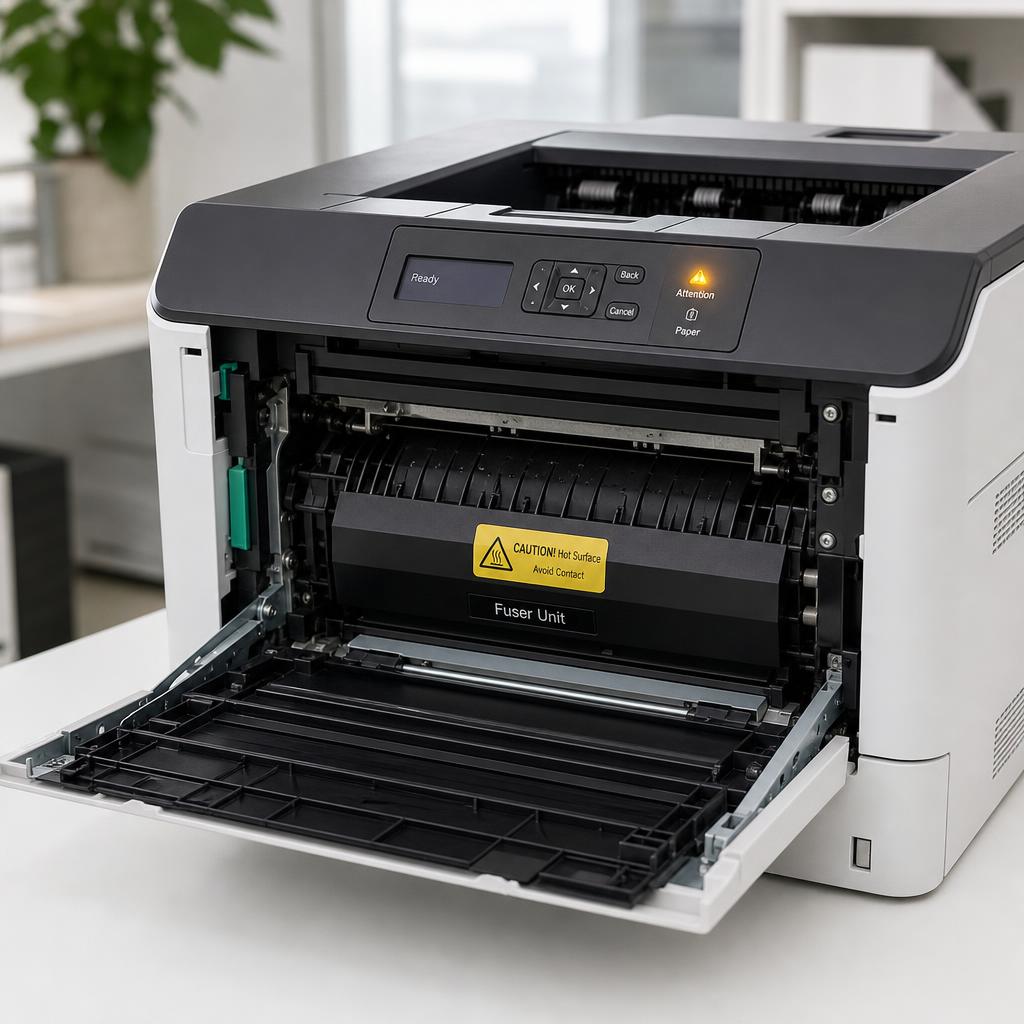
On laser printers the fuser bonds toner to the page with heat, and faults here are a common source of high-severity codes. This family is the clearest example of “power cycle once, then stop” if it persists.
How you'll usually notice this
- A numeric code starting with 50, fuser, or heat appears on the display
- The printer warms up but never completes its ready cycle
- Print jobs stop immediately without producing a page
- A distinct warm or slightly burnt smell from the rear of a laser printer
- "Replace fuser", "Fuser Error", or "50.x Error" in the companion app
First things to check
- Power the printer fully off — not just sleep mode — and unplug it from the wall
- Wait at least 30 minutes for the fuser to cool completely before doing anything
- If you recently handled the fuser, confirm it is seated and latched correctly (machine unplugged)
- Plug back in and power on once — many transient fuser codes clear here
- If the code returns after the full cool-down cycle, stop and arrange service
Error Entries
The printer’s controller decided the fuser did not warm up correctly, ran too hot, or lost its temperature reading. HP documents this as the 50.x family; other laser brands have their own equivalents. It is a hardware-protective fault: the machine stops to avoid damage, and a persistent version almost always means the fuser or its sensor needs service.
Common Causes
- A worn fuser unit at or beyond its rated life
- A faulty thermistor or thermal sensor mis-reading temperature
- A fuser not seated correctly after maintenance
- A power supply or controller fault feeding the fuser
What to do
- Power the printer off, wait until it is fully cool, and power it on once to clear a transient reading.
- If you recently removed the fuser, confirm it is seated and latched exactly as before — with the machine off and cool.
- Do not repeatedly force past a returning fuser code; each attempt risks further damage.
- If the code persists, treat it as service territory and arrange a fuser inspection or replacement for your model.
Laser printers across HP (50.x family), Brother, Lexmark, Kyocera, Samsung, Ricoh, Xerox and others; exact codes differ.
Full guideThe laser scanner assembly that writes the image onto the drum reported a fault — often a beam-detect or scanner-motor error. It is an internal optical-mechanical component, so a persistent code here is a hardware fault rather than something to clear by hand. Brands number it differently, and the meaning depends on the model.
Common Causes
- A failing scanner motor or mirror assembly
- A beam-detect sensor no longer reading correctly
- A loose internal connector after a knock or transport
- General wear on a high-mileage machine
What to do
- Power cycle once to rule out a transient error.
- Do not open sealed optical assemblies — this is not a user-serviceable area.
- Note the exact code and when it appears for the technician or brand library.
- If it persists, arrange service; the laser-scanner unit is a repair, not a DIY fix.
Laser printers across most brands; codes and wording are model-specific.
The drum or imaging unit — which carries the toner image before it is transferred to paper — is reporting a fault or the end of its rated life. Some drum messages are a routine replacement prompt (low severity); others indicate a genuine imaging-unit fault (higher severity). The brand library tells you which your code is.
Common Causes
- A drum or imaging unit at the end of its documented life
- A drum not seated correctly after a consumable change
- A dirty or faulty drum-detect contact
- Physical damage to the drum surface
What to do
- If the message is an end-of-life prompt, install a fresh drum or imaging unit for your model.
- If you just changed the unit, re-seat it fully with the machine off.
- Handle drums by their edges and keep them out of direct light.
- For a fault (not just a life warning) that persists, check the brand library and consider service.
Laser printers; some brands combine the drum with the toner cartridge, others sell it separately.
Stop troubleshooting if you notice
- The code returns after a single, proper power-off-and-cool cycle
- You detect any burning smell or see smoke — unplug immediately
- The fuser is visibly cracked, warped, or has paper melted to it
- You have already power-cycled more than once — further attempts risk permanent damage
Related Guides
Printhead & ink-system families (inkjet)
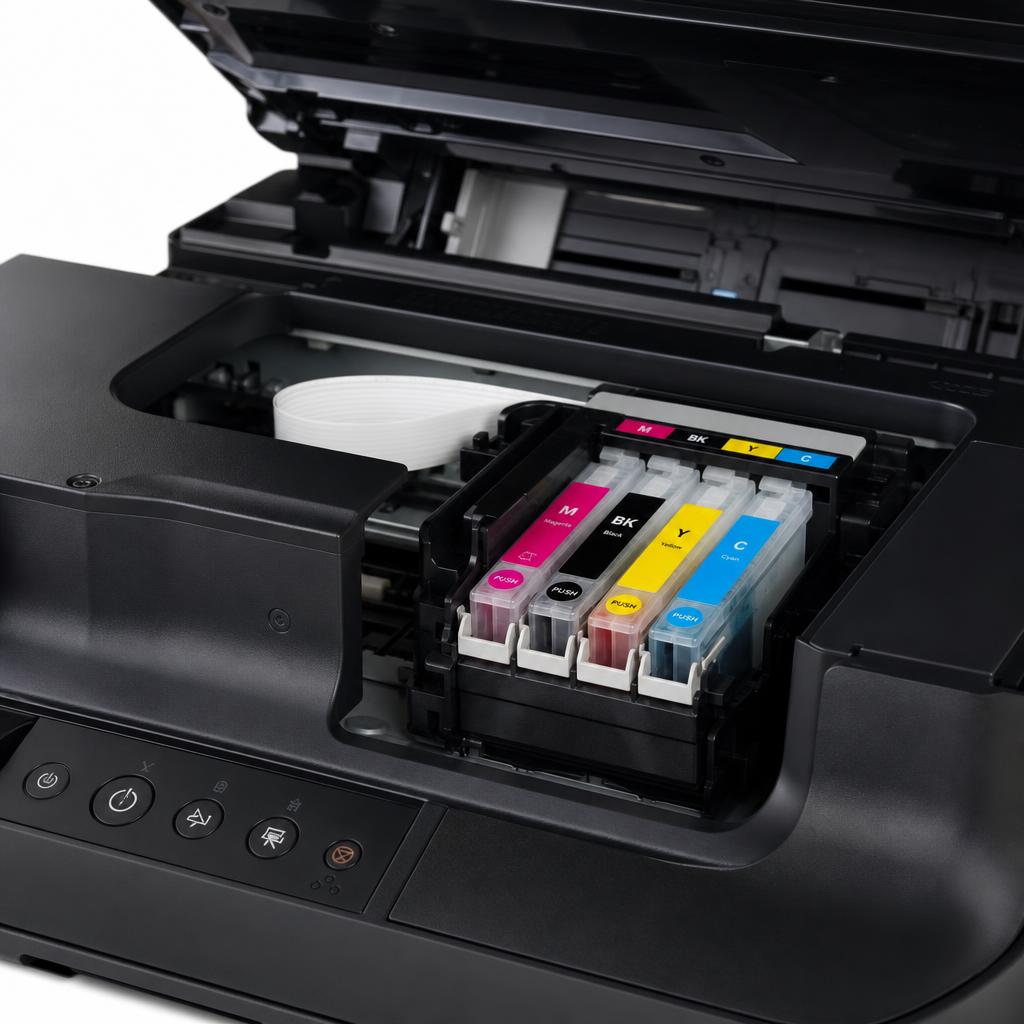
Inkjet-specific faults centre on the printhead and the ink delivery system. Some are cleared with a maintenance routine; others — like Canon’s B200 or absorber messages — sit closer to service.
How you'll usually notice this
- Print quality degrades before the error — streaks, missing colours, or blank patches
- "Printhead Error", "B200", or "Ink System Failure" appears on the display
- "Ink Cartridge Not Recognised" or "Cartridge Error" shown on panel or app
- "Ink Absorber Full" or "Maintenance Box End of Life" message
- The printer starts a cleaning cycle but then stops with an error
First things to check
- Power the printer off and on once — some printhead codes clear on a clean restart
- Remove each cartridge and confirm: all protective tape is removed, it clicks fully in
- Wipe cartridge contacts gently with a dry, lint-free cloth — never use wet wipes
- If the printhead is removable, gently re-seat it and clean its contacts
- Check the maintenance box (if your model has one) and replace if at capacity
- Run the manufacturer's built-in cleaning routine only if the printer otherwise recognises the head
Error Entries
The printer cannot communicate with, or has detected a fault in, the printhead. Canon’s B200 is the best-known example, but Epson, HP and Brother inkjets have their own versions. Depending on model and firmware it can be a recoverable seating or contact issue, or a genuine failed printhead requiring service or replacement.
Common Causes
- A printhead not seated correctly or with dirty electrical contacts
- Dried ink or clogged nozzles after long disuse
- A genuinely failed printhead at end of life
- A voltage or logic-board fault (as with some B200 cases)
What to do
- Power the printer off and on once — some printhead codes clear on a clean restart.
- On models where the head is removable, gently re-seat it and clean the contacts with a lint-free cloth (machine off).
- Run the manufacturer’s cleaning routine only if the head is otherwise recognised.
- If the code returns immediately, check the brand library — a persistent printhead code is often service or replacement territory.
Inkjet printers; Canon (B200), Epson, HP and Brother all have printhead fault families with model-specific behaviour.
Full guideThe printer cannot read a cartridge, or is rejecting it as incompatible or non-genuine. This family spans a genuinely empty slot, a chip contact problem, and firmware that objects to third-party or refilled cartridges. Most are routine to resolve; the response depends on your brand’s policy and your model.
Common Causes
- A cartridge not clicked fully into place
- Protective tape or a clip left on a new cartridge
- Dirty or damaged cartridge contacts or chip
- A third-party or refilled cartridge the firmware does not accept
What to do
- Remove and reinstall the named cartridge, confirming all tape and clips are removed.
- Wipe the contacts gently with a dry lint-free cloth and reinsert.
- Confirm the cartridge is the correct model number for your printer.
- If a non-genuine cartridge is being rejected, consult the brand library for that model’s policy and options.
Inkjet printers across HP, Canon, Epson and Brother; cartridge recognition behaviour varies by brand and firmware.
Inkjets collect waste ink from cleaning cycles in an absorber pad or a replaceable maintenance box. When it fills, the printer warns and eventually stops. On models with a user-replaceable maintenance box it is routine; on models with a fixed internal absorber it can mean a service reset or replacement — the brand library explains which your model uses.
Common Causes
- Normal accumulation of waste ink over the machine’s life
- Frequent cleaning cycles accelerating the fill rate
- A maintenance box at the end of its documented capacity
- A fixed absorber pad reaching its limit on an older machine
What to do
- If your model uses a replaceable maintenance box, fit a fresh one of the correct part number.
- If it is a “nearly full” warning, plan the replacement before it becomes a hard stop.
- Reduce unnecessary cleaning cycles to slow the fill rate.
- For a fixed internal absorber, check the brand library — this often needs service rather than a home reset.
Inkjet printers; Epson and Canon commonly use maintenance boxes or absorber pads with model-specific handling.
Stop troubleshooting if you notice
- The error returns immediately after every power cycle — the printhead has likely failed
- You detect a burning smell or the printhead is physically damaged
- The "Ink Absorber Full" message is on a model with a fixed internal absorber — this needs a service reset
- A Canon B200 persists after re-seating — this often indicates a board-level fault
Related Guides
Consumable, network & controller families
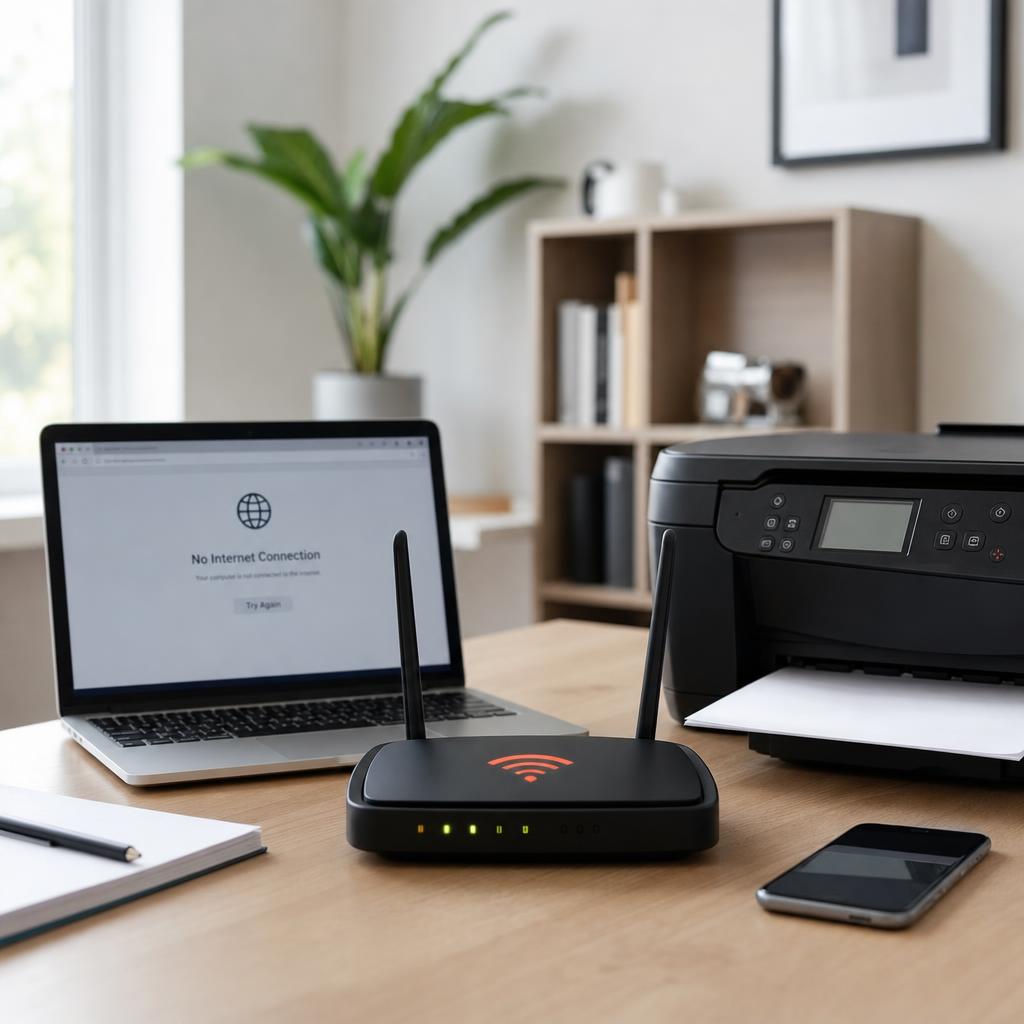
The remaining shared families: consumable lifecycle messages, network and communication faults, and the firmware or controller codes that sit firmly in service territory.
How you'll usually notice this
- Toner or ink warning progressing from "Low" to "Replace" to a full stop
- Printer appears offline in Windows or macOS — jobs queue but nothing prints
- Wi-Fi light is off, blinking amber, or the panel shows "Not Connected"
- "49.XX.YY Firmware Error" or "SC" service code on the display
- "Service Required" or a persistent attention light with no clear consumable cause
First things to check
- For toner/ink warnings: keep printing until "Replace" then install the correct part number
- For network issues: print a network configuration page to see the printer's real IP and connection state
- Confirm the printer and computer are on the same Wi-Fi network or Ethernet switch
- Restart the router, printer, and computer in that order — wait 30 seconds between each
- In Windows, clear the print queue and uncheck "Use Printer Offline" in the printer settings
- For firmware or controller codes: power cycle once and cancel any stuck large print jobs
Error Entries
A staged warning that a consumable — most often toner on a laser machine — is running down. It progresses from “low” to “replace” to a stop, and is entirely routine. Some brands let you keep printing past “low” with a temporary override; the exact behaviour and any toner-reset step vary by model.
Common Causes
- A toner cartridge approaching the end of its yield
- A near-empty cartridge triggering a stop threshold
- A cartridge reporting low after a page-heavy job
- A toner-detect contact needing a clean on reinsertion
What to do
- For a “low” warning, keep printing but have a replacement of the correct part number ready.
- For a “replace” or stop, fit the new cartridge, removing all seals and shaking it gently if the model advises.
- Perform any toner-reset step the brand library documents for your model.
- If a fresh cartridge still reads empty, clean the contacts and check the brand library.
Laser printers across every brand; override and reset behaviour is model-specific.
The printer cannot reach — or be reached by — the network or the computer sending the job. It shows as a communication code, a “not connected” message, an offline state or a Wi-Fi light. It is usually an environment problem (router, IP, cable) rather than a printer fault, and it is almost always DIY-resolvable.
Common Causes
- Wi-Fi dropped, or the printer moved out of good signal range
- An IP address that changed after a router restart
- A loose or faulty Ethernet cable, or the wrong port selected on the computer
- The printer set to offline in Windows, or a stalled print queue
What to do
- Print a network or configuration page from the panel to read the printer’s real IP and connection state.
- Confirm the printer and computer are on the same network, and reseat any Ethernet cable.
- Restart the router, printer and computer, then reconnect if the IP has changed.
- In Windows, clear the queue and ensure “Use Printer Offline” is not ticked; on macOS, resume the queue.
- Use the brand’s app or embedded web server to confirm the network path from any computer.
All networked printers; signalling and the exact web-server or app name differ by brand.
Full guideA fault in the printer’s firmware or main controller board — HP’s 49.XX.YY firmware family and Ricoh’s SC service codes are well-known examples. Some are transient and clear on a power cycle; others are hard faults that need a firmware update or board service. A persistent controller code is squarely service territory, not something to force past.
Common Causes
- A corrupt job or data stream triggering a firmware error
- Firmware that is out of date or interrupted mid-update
- A failing controller or formatter board on an older machine
- A memory or storage fault inside the printer
What to do
- Power the printer off, wait about thirty seconds, and power it on once — many firmware codes clear here.
- Cancel and delete any large or stuck job that may have triggered it, then resend a simple test page.
- Apply an official firmware update for your model only if the brand documents it as the fix — never interrupt an update.
- If a controller or service code returns after a power cycle, stop and arrange service for your model.
All brands; HP (49.XX.YY) and Ricoh (SC codes) are common examples, with model-specific meanings.
Full guideA catch-all message or light that tells you the printer needs attention without naming the exact part — “Service required”, “Printer error”, or a persistent attention light. It is the machine’s way of saying it cannot self-resolve. Whether it is minor or serious depends entirely on the underlying code, which the brand library reveals.
Common Causes
- An internal fault the panel cannot describe in full
- Several minor conditions combining into a single attention state
- A sensor or mechanism that has failed self-recovery
- A hardware fault at or beyond the machine’s rated life
What to do
- Power cycle once — generic attention states sometimes clear if the cause was transient.
- Check the brand’s app or embedded web server for a fuller description than the panel shows.
- Note the exact wording and any numeric code that accompanies it.
- If it persists with no clear consumable or paper cause, treat it as service territory and consult the brand library.
All brands; the underlying cause and severity are model-specific.
Stop troubleshooting if you notice
- A firmware or controller code (e.g. 49.XX.YY) returns after one power cycle — do not force past it
- The printer is mid-firmware update and stops — do not power off, contact brand support
- A "Service Required" message persists after addressing every obvious consumable or connectivity cause
- You smell burning or see physical damage to the main board area
Related Guides
Frequently Asked Questions
Beginner-friendly answers about printer error codes.
A printer error code is the machine's compressed way of telling you that something prevented it from completing a task. When a printer detects a fault — a sheet stalled in the paper path, a fuser failing to heat, a cartridge running dry, or a network connection dropped — it signals the problem through a number on the display, a plain-language message, a pattern of blinking lights, or a notification in the companion app. The code identifies the affected area so you know where to start investigating.
Printers are built with sensors throughout their paper path, ink system, heating elements, and network components. When one of those sensors detects a condition outside its normal range — paper not moving where expected, temperature too high or too low, a cartridge not responding — the printer's controller logs the fault and stops the machine to prevent further damage. The code is the machine protecting itself and asking for your attention.
No. There is no shared standard, so each manufacturer designs its own scheme. A code number on an HP printer is unrelated to the same number on a Canon or Brother machine. What is consistent is the family a code belongs to — jam, fuser, printhead, consumable, network or controller — which is why this reference groups faults by family and then sends you to the specific brand library for the exact meaning on your model.
Follow the universal decode workflow: read the code exactly, character for character; note when it appears, such as at power-on or mid-job; power the printer off, wait about thirty seconds, and power it on once; then look the code up in the brand library that matches your printer. Only after that should you act on anything irreversible, because the correct step depends on your model, generation and firmware.
Because manufacturers reuse and revise their code tables across product generations and firmware versions. The same number can carry a slightly different meaning on two machines from one maker, and light patterns differ across a single product line. That is why every meaning on this page is written as a family and why you should always confirm the precise meaning for your exact model in the relevant brand library.
Paper-path and jam codes, paper-size mismatches, empty or low consumable warnings, and network connectivity errors are almost always safe to resolve yourself — they are the everyday, low-severity family. Fuser temperature errors, laser-scanner faults, printhead-motor errors, and controller or firmware codes that return after a single power cycle are hardware territory. The severity label on each entry in this reference (low, medium, or high) helps you make that call quickly.
Consumable and paper-path codes are almost always yours to clear. Heat and fuser codes, laser-scanner faults, printhead motor errors and controller or firmware faults that persist after a single power cycle are hardware territory. Repeatedly forcing past those can turn a repairable fault into a replacement, so if a high-severity code returns after one power cycle, stop and arrange service for your model.
Note exactly which lights are on, which are blinking, and their colours, then look that pattern up in your model's manual or the brand's LED reference. Light grammar is not standardised, so the exact pattern varies by model and must be confirmed against your specific guide. Photographing the panel helps, and the brand's companion app or embedded web server often shows a fuller description than the lights alone.
A single power cycle — fully off, wait about thirty seconds, fully on — clears many transient codes and is the safe first move. What you should not do is repeatedly power cycle or force past a code that keeps returning, especially a fuser, laser or controller fault, because that risks compounding a genuine hardware problem. If one power cycle does not resolve it, look the code up rather than cycling again and again.
A "low" warning is safe to acknowledge and keep printing — it is an advance notice, not an immediate stop. Most printers will continue producing acceptable output until the "replace" or "empty" threshold is reached. However, do not ignore it indefinitely: have a replacement of the correct part number ready before it becomes a hard stop mid-job. Running a cartridge completely dry on an inkjet can draw air into the printhead, which can cause blockages.
Yes, in some cases. Firmware updates occasionally resolve codes caused by software bugs, improve compatibility with third-party consumables, or fix false-positive sensor readings. However, only apply a firmware update if the brand's own support documentation names it as the fix for your specific code — never apply an update to a printer already displaying a controller or firmware error, as an interrupted update can make the machine unresponsive.
Intermittent codes are usually triggered by a specific condition that is not always present — for example a job over a certain size triggering a firmware timeout, a paper tray that only misfeeds when the stack is below a certain level, or a Wi-Fi signal that drops when the router is under load. Noting exactly when the code appears (which job, which tray, which paper size, over which connection) is the most useful diagnostic information you can collect before looking it up.
Before calling service, collect the following: the exact code or message character for character; the printer brand, model, and approximate age; whether the code appeared at power-on or mid-job; which tray or paper size was in use; and what you have already tried. Also run the brand's built-in diagnostic or network page if the printer is responsive — technicians use that information to scope the job before they arrive, and providing it upfront often speeds up the repair.
It depends on the brand and firmware. Many printers accept compatible third-party cartridges without issue; others — particularly those with firmware designed to check chip authentication — will show a "cartridge not recognised" or "non-genuine cartridge" message. Some brands also push firmware updates that tighten these checks. The safest approach is to use genuine cartridges if error codes are a concern, or to check community forums for your specific model before switching to compatible alternatives.
It depends on what the service code identifies. A "service required" that masks an ink-absorber or maintenance-box issue may allow limited continued use while you arrange the fix. A fuser, laser, or controller service code should not be forced past — continuing to print can cause heat damage, paper fires, or a fault that renders the machine uneconomical to repair. When in doubt, power the machine off and consult the brand library or a technician before continuing.